
Weeks 4 and 5: Meat — it's what's for...every single meal
So much meat. So little time.
Weeks 4 and 5 marked the moment many of us had been waiting for: cooking land animal proteins, like poultry, lamb, beef, veal, pork and game. I am combining the two weeks because we covered very similar topics. The only real difference between the two weeks was that we took our final exam and practical evaluation for Level 1 in the middle and advanced to Level 2 with a new instructor. Spoiler alert — I passed!
I don’t know about you, but my meat cooking at home has mostly been limited to chicken, beef, and an occasional lamb chop. So being able to play with things like duck, quail, veal, venison and rabbit was pretty special. It’s certainly unusual for your average person to see a pile of 30 quails or 15 whole ducks at at a time, ready to be cooked. Even in small amounts, these proteins are hard to find in your average grocery store. So it was a treat to have easy access to them, and even better to get such specific instruction around how best to cook them. NOTE: if you are triggered by depictions of animal carcasses, please skip over the below gallery!
Scroll through below for our lessons in butchery of various animals. Pictured are venison, pork, and pheasant.


Vibe wise, class continued to be pretty intense. The dishes have been getting increasingly complex, involving multiple proteins, vegetables, starches and sauces cooking simultaneously. Reflecting on it now, I realize what an insane amount I have learned in such a short amount of time and am grateful for that intensity. And a big benefit to having such a jam-packed stretch of class was the bonding that started to occur within our group; everyone helped each other out, commiserated when things went wrong, and emerged better for the experience at the end. A bit like fraternity hazing. Just kidding! Kind of.
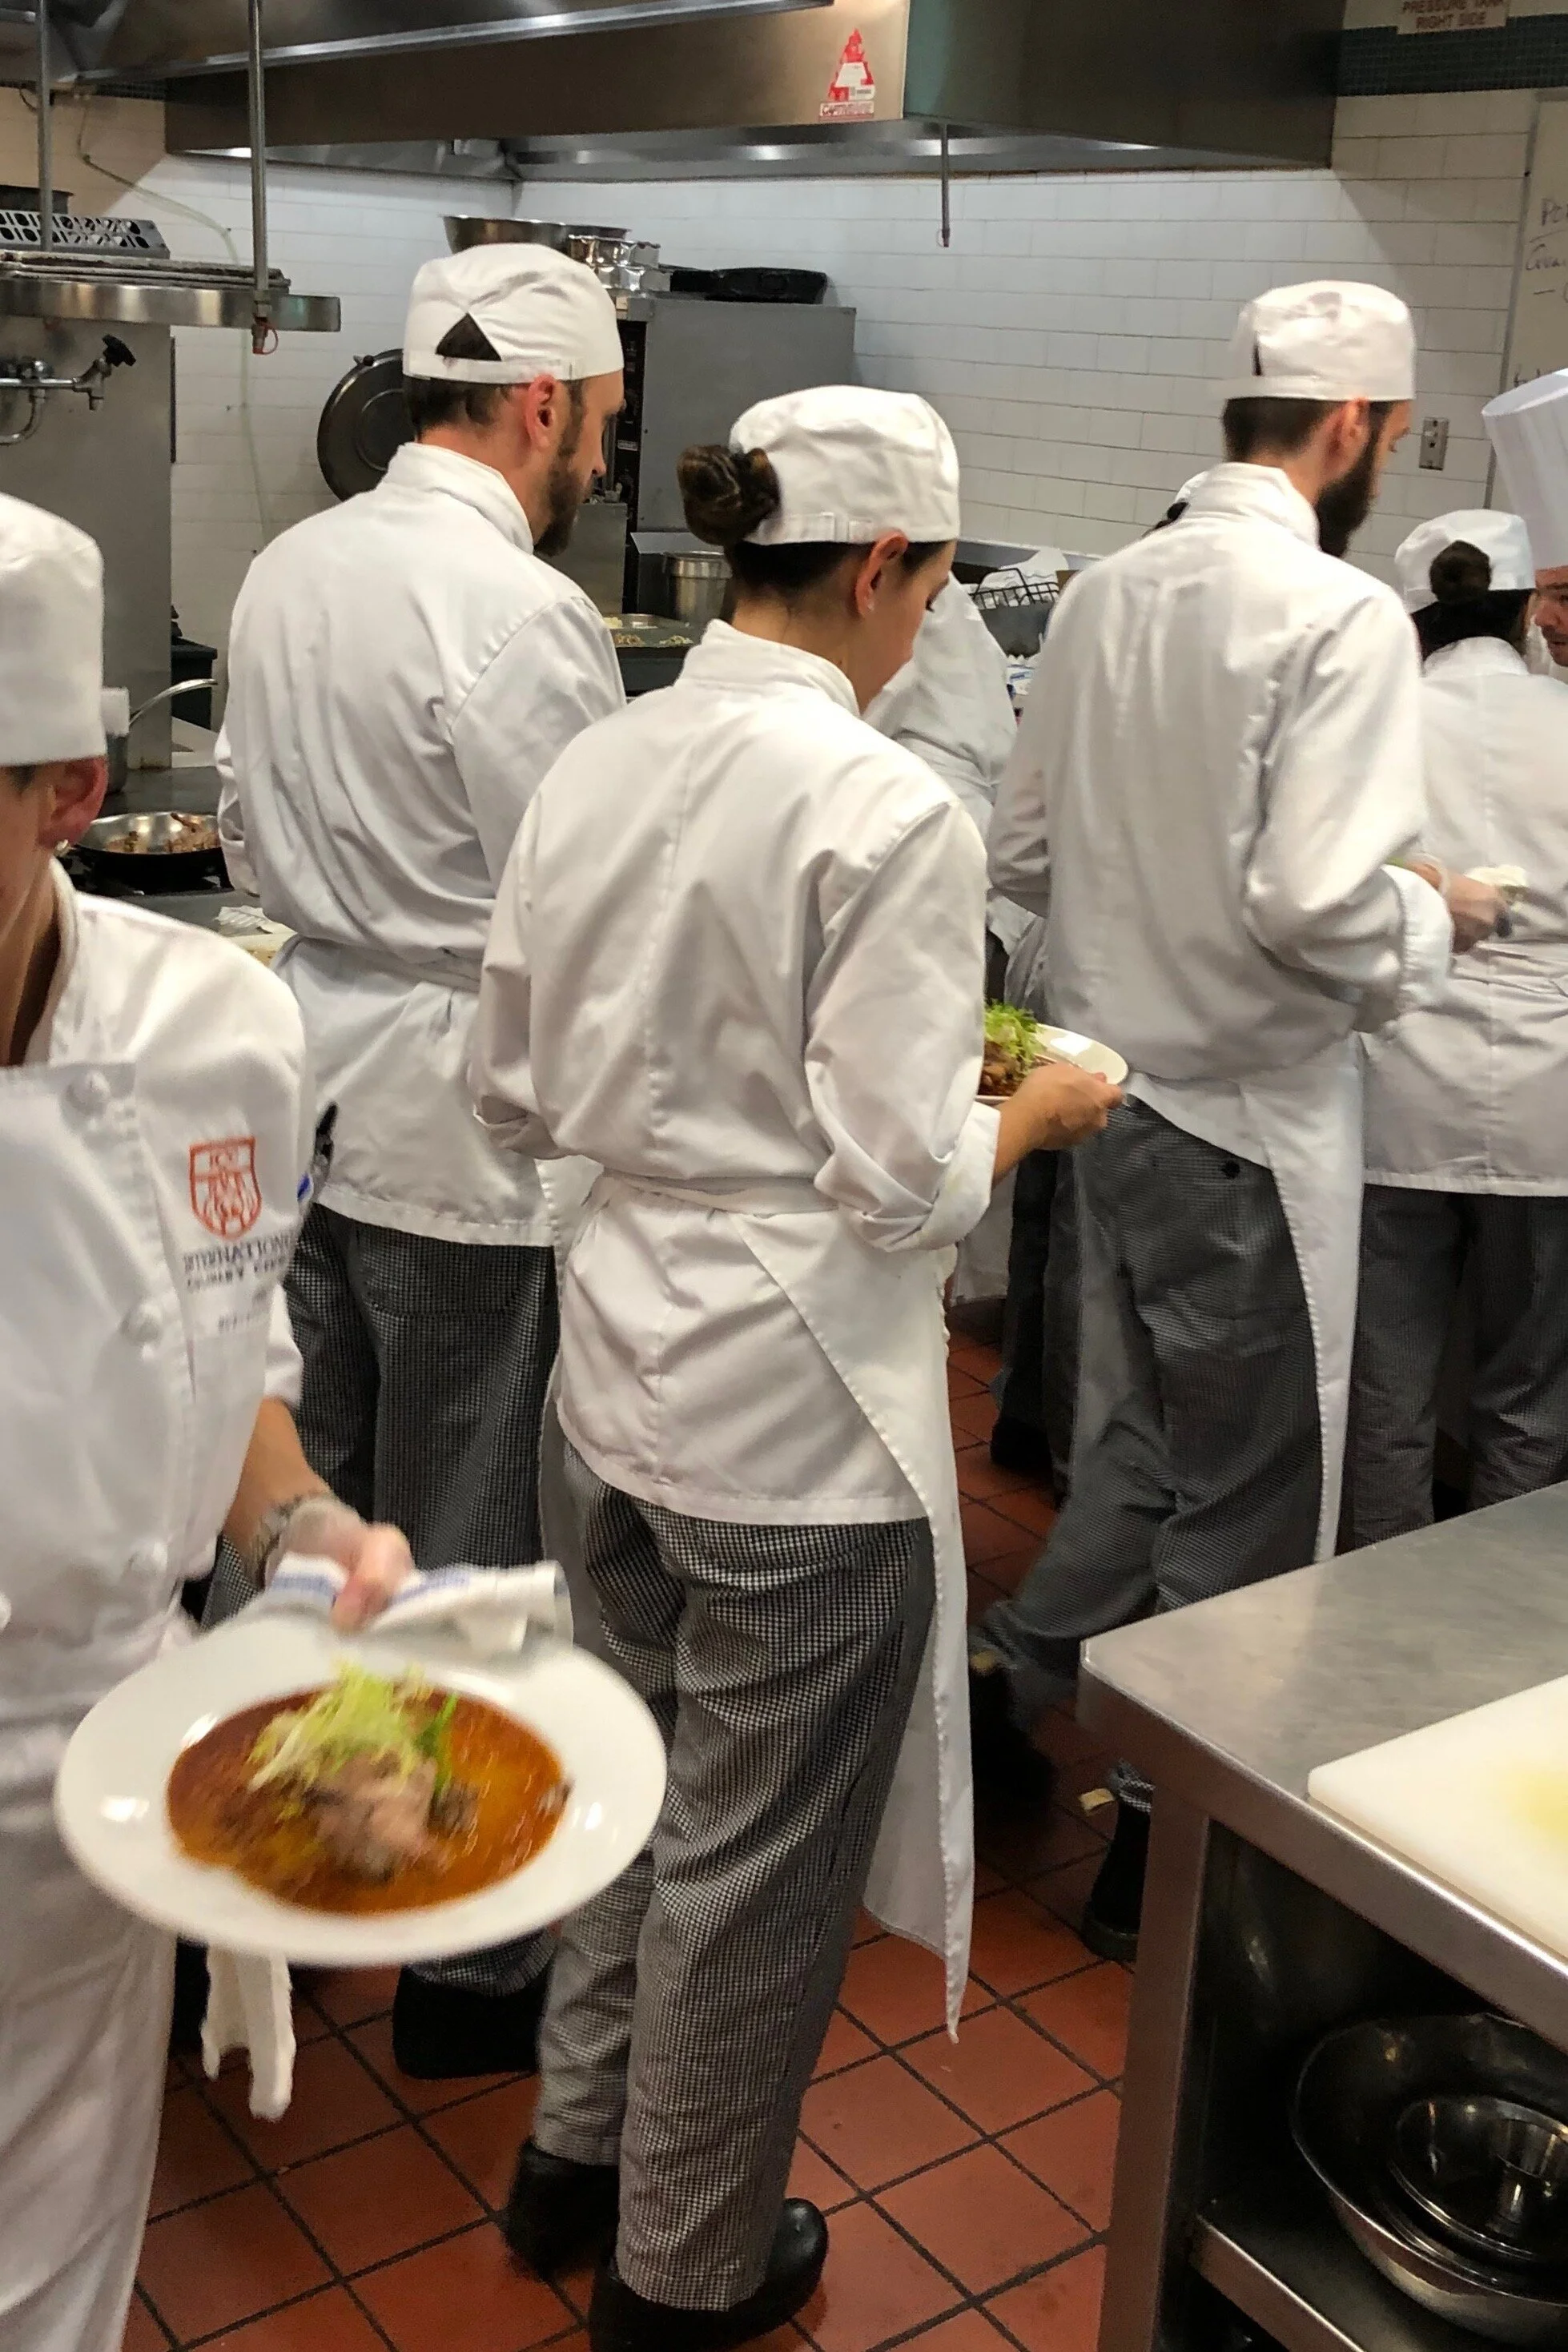
My classmate Blake caught me nervously inspecting my stuffed quail dish while waiting to get it evaluated.
Interestingly, with a shift to a new instructor at the beginning of Week 5, the atmosphere of the class definitely changed. Our Level 1 instructors ran our classroom like an old-school restaurant kitchen — a very tight ship, with no chatting, only focusing on preparing your food. It wasn’t uncommon to hear from the front of the room, “Quiet! You aren’t good enough at what you’re doing to be talking while you’re doing it!" Level 2 feels like more of a classroom with room to explore, and we are able to joke around with the chefs and each other as long as we are getting everything done. There are pros and cons to each approach, but I’m certainly feeling more relaxed now!
Back up...you have exams in culinary school?
Why yes, we do! For our final, we had a full day of testing that involved a written exam covering all the theory and facts we’d learned to date, as well as a set of practical exercises we needed to complete in a specific amounts of time. We had...
20 minutes to:
Thinly slice half an onion
Finely chop a shallot and the other onion half
Peel and cut a carrot into very thin strips called julienne (2.5 in long, 1/16 inch thick, and square on all sides)
Peel and cut a turnip into slightly thicker strips called jardiniere (2 in long and 1/5 inch thick, also square on all sides).
…it sounds like a lot of time, but those skinny cuts take a while! And once you factor in the time it takes to peel all those vegetables it’s really more like 15 minutes.
30 minutes to extract a perfectly trimmed heart from an artichoke and cut a potato into 8 cocottes - little football shaped nuggets
30 minutes cook a tomato fondue, which is a simple tomato sauce made from olive oil, shallots, and peeled, seeded and cored tomatoes
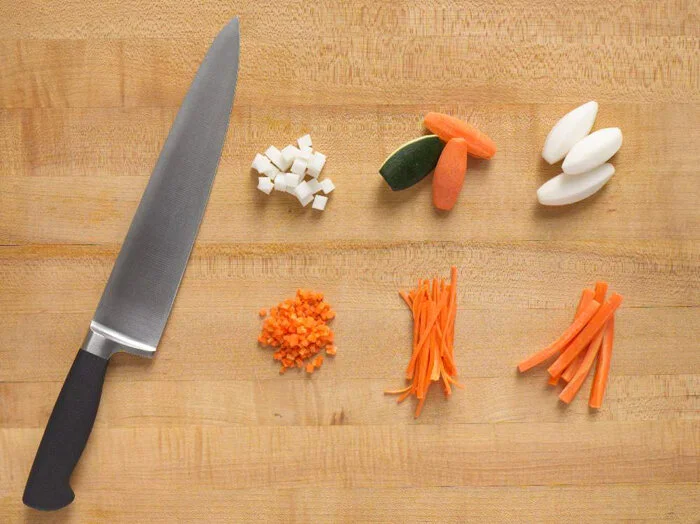
Our Level 1 final tested us on our knife skills, specifically cocottes (top middle and right), julienne (bottom middle), and jardinière (bottom right). Photo courtesy of the International Culinary Center.
It really felt like a Food Network show, with everyone racing down to the wire to get their cuts / dishes done and our instructors shouting “KNIVES DOWN. WALK AWAY FROM YOUR STATION. THAT MEANS YOU, CHLOE.” We stood in the hallway and watched through the windows of our kitchen classroom as they walked from station to station and tried to read their expressions as they evaluated our work. I ended up with a 100 on the theory exam and a 91 on the practical. I’ll take it!
Big learning 1: A handy dandy framework for heat-based cooking
Ok, enough with the exam and back to the meat. Being exposed to so many animals in a short amount of time began to highlight the muscular / skeletal similarities among them, which makes things like butchering and deciding on the right cooking technique a little easier when you’re not sure where to start. By cooking technique, I am referring to a categorization that I was not previously familiar with: dry, wet, and mixed cooking. This was a big theme of our weeks 4 and 5 that came up basically every day, so I’ll do a brief recap:
Dry cooking is any technique that does not use a water-based liquid to transfer heat, and it results in beautiful browning, which is great for flavor as well as visual appeal. Examples include searing, sautéing, baking, broiling, grilling, and frying (counterintuitive because it’s wet, but there’s no water in a fryer!). We learned that whenever you want your food to brown, you want to minimize its exposure to moisture as much as possible, because browning occurs at a temperature that is higher than the boiling point of water, so if there’s any liquid present the food will not be able to reach that high temperature.
Below, examples of dry cooking include grilling, sautéing and frying.

Grilling. Photo courtesy of Thrillist

Sautéing. Photo courtesy of Anova.

Frying. Photo courtesy of the New York Times.
Wet cooking is what it sounds like: a technique that utilizes liquid to cook, such as boiling, steaming, simmering and poaching. This is good when you don’t want your food to brown. With the exception of boiling, wet cooking is generally a pretty gentle way to cook that maintains tenderness in delicate foods, and it works really well when you want to infuse flavors into the foods via liquid, and/or when you want to make a flavorful sauce for your final presentation that harnesses the flavor of the meat you’re cooking in it.
Mixed cooking, the third technique, involves both dry and wet elements. For example, in braising and stewing, which are types of mixed cooking, the main ingredient is typically seared in advance to give it that nice browned color and roasty flavor (dry technique), and then partially or fully submerged in liquid and cooked for a long time to break down the typically tough cuts of meat that are well suited to this cooking method.

Chicken being poached in an aromatic broth, an example of wet cooking. Photo courtesy of simplyrecipes.com.

A rabbit dish we made by stewing, which is an example of mixed cooking. You can see the brown coloration on the meat — that’s because the rabbit was seared first (dry), then stewed in stock (wet).
Big learning 2: Animal proteins — same same, but different
While all meat requires different treatments and obviously has different flavors, there were some repeated processes and themes that came up to help us contextualize the world of meat as a whole.
1) No matter the type of cooking technique you use with meat, one constant is that it’s incredibly helpful to have easy access to a thermometer to check the doneness of your meat by inserting it into the thickest part of the muscle. For red meat e.g., beef, pork and lamb, you want it to be cooked to 145° F, and poultry to 165° F. I bought this fantastic and not crazy expensive digital thermometer that our chef recommended, and I really like it. It reads temperatures super quickly and folds up so that it’s easy to carry and store in your pocket, a must when you are running around the kitchen. One thing to note is that your meat will continue to increase in temperature at least a few degrees for a few minutes after you stop cooking it — a concept called carryover cooking — so it’s okay to take it out when the temp is a little lower than the ones I listed just now.
Analog and digital thermometers both work well to check the doneness of meat. We got the analog one with our school kit, but I decided to purchase the Javelin digital thermometer because it’s more precise and reads temperature more quickly.


2) If you want to make a delicious sauce that tastes like and complements the meat you are cooking, it pays to use a “reinforced stock” as the liquid base for that sauce. Basically, this is an already made stock that you fortify with bones / trimmings from the animal, as well as aromatics like vegetables and herbs. We made a lot of these over the course of the two weeks, typically browning the bones / meat first, then browning some mirepoix (carrots, onions, celery) and simmering that in the existing stock we had on hand. This process multiplies the meat flavor and adds thickness and body, which really makes a difference when you are reducing it down to a syrupy consistency to make a sauce at the end. All those flavors intensify beautifully. At school we always have fresh stock which is fantastic, but I think this would work really well at home with boxed stock to make it taste more homemade.

Here, some reinforced stock in the works. I learned a tough lesson which is NEVER get rid of your stock if you have some left over. One day when we were making pork, we made an incredibly rich reinforced stock by simmering it all morning with browned bones, meat trimmings and vegetables. We used about half of our reinforced stock to make a sauce for the first dish and then took a break for lunch, during which we were all cleaning up. I have been working on the cleanliness of my station and was trying to make sure our area was spic and span, and I accidentally dumped the remainder of our reinforced stock, thinking we didn’t need it anymore. I was wrong. My poor partner Melissa — I have never seen a pair of eyes get so wide in panic as when she learned what I had done. Fortunately I was able to covertly find some spare stock hanging around the kitchen, so I boiled that down and “borrowed" a few ladles of reinforced stock from a magnanimous classmate to fortify it. It wasn’t quite the same, but it worked in a pinch. A dumb move on my part that I quickly fixed to avert disaster. Lesson learned: I will never throw stock away again. It can always be used for something. Second lesson: when you screw up, don’t despair; think quickly and do your best to get back on track!
3) You can follow a general rule of thumb for cooking tough vs tender cuts of all types of meat. If you have a tender cut like a loin or a breast, you want to cook it quickly and with enough heat to get it to the temperature you’d like to serve it at, and no more. This goes for chicken, duck, veal, beef, lamb, rabbit…you name it. Typically this would be a dry cooking technique. For a tougher cut with a lot of connective tissue, like a hard-working leg, shoulder, or butt, low and slow is the game. This is because a low and slow method breaks down that connective tissue into soft and moist gelatin over time, giving the meat an amazing texture and lots of moisture. If you cook something with very little connective tissue low and slow, it will just dry out.
Now, onto the meat!
Poultry (chicken and game birds)
We spent about three days in total on poultry, making multiple chicken recipes, as well as a few duck and quail ones. A big part of these lessons involved quartering, which is the fancy way of saying “butchering” for a bird: breaking it down into two breasts and two joined leg/thighs using a special knife called a boning knife, which is stiff, long and thin with a highly pointed tip. I have mentioned in previous posts that I am a little spatially challenged. This does not bode well for butchery, when every carcass looks a bit different (to a newbie like me) and it’s a little confusing to distinguish between the muscles. The trickiest part was for me was trying to preserve the “oyster” which is a little muscle at the top of the thigh that is prized for its tenderness. It is very small, kind of hard to see, and easy to slice through. I learned that firsthand. If anyone out there is good at butchery and wants to tutor me, I’ll buy you a nice bottle of wine!
We also explored the effects of different cooking methods on the birds. We poached, sautéed, and roasted chickens; we seared and stewed duck; and we stuffed quail. It’s fun to practice multiple techniques on similar ingredients in a short amount of time because it really highlights the changes in the end result. Our chicken poached in turmeric broth was mild and soft in flavor and texture, taking on the character of its poaching liquid, while our roasted bird was crispy, juicy, and quintessentially chicken-y. When we roasted the whole bird, we browned it in a pan on its back and sides to jump-start the cooking process, since those parts take longer to cook than the breasts. This was harder than it sounds. I accidentally lit my chicken on fire three times. When there’s lots of oil and high heat in a pan and a large, unruly bird that you’re trying to manage with just a meat fork and a spoon, bad things are bound to happen! I blew out the fires and, ironically, the feedback I got for that chicken was that it could have been more browned. I guess my instructor was none the wiser.

Chicken poached in turmeric broth. Personally I prefer a dry cooking method for chicken, especially the breast.

Chicken, grandma-style, which involved the dry cooking techniques of sautéing and roasting. This was the one I lit on fire but ended up not being quite brown enough 🙈
Like the chicken, we made a version of the classic French dish duck a l’orange, where we used multiple cooking techniques on different cuts of meat: we stewed the duck legs in a reinforced stock with orange zest and flesh, and seared the breasts in a pan. The texture of the legs was succulent, viscous, and falling off the bone, whereas the breast was springy, tender and juicy. Quartering the duck was basically the same process as quartering a chicken but easier because the bird was bigger. It also helped that my partner Jason grew up hunting and has been breaking down various types of game meat since he was a kid. Needless to say, we had no issue keeping the oyster muscle intact on those thighs! Check out the tips and tricks section at the end of this post for a foolproof way of cooking a duck breast that crisps the skin and gets rid of all that extra fat while maintaining the juiciness of the flesh.

Duck two ways in orange sauce. The breast was sautéed and the thigh (in the back) was stewed. Next time I will remove a little more fat from the end of breast when quartering the duck.

We had another shot at pommes darphin, the fancy potato latke I attempted and burned in week 3. This one turned out a lot better!
At the end of the two weeks, we capped off our poultry exploration with a galantine, which is an old-school preparation of meat that is deboned, stuffed, rolled in its own skin, cooked, sliced and served. We made a chicken version, which involved removing the breast, thigh and leg from the carcass with the meat and skin intact, taking out all the bones, filling it with chicken mousseline, (a seasoned, pureed mixture of chicken, cream, egg whites and herbs), and then wrapping it all up into a sausagey tube to poach and then sear. Very old school French. I probably wouldn’t make it for a dinner party, but you never know.

Mousseline in a pastry bag, which is a puree of meat with cream, egg whites and herbs. Kind of looks like what McDonalds uses to make their chicken nuggets. We stuffed our chicken with it.

Our chicken galantine being stuffed with mousseline. We removed the breast, thigh, and leg from the carcass with the skin intact so that we could roll it into a stuffed sausage.

Said sausage, post-poaching, being seared in a pan before slicing and serving.

My sliced galantine and stuffed vegetables smiling from the plate. Say cheese!
The chef also made us a loaf of chicken liver pate from our chickens, which uses basically a 2:1 ratio of pureed chicken livers to butter, which then gets “iced” in more butter to keep it from oxidizing when exposed to air. Kind of looked like a carrot cake. A few people were hesitant to try it and our instructor said, “you are trying this. It’s not a choice. If you don’t try it, get out of here!” I wasn’t one of them. I was eager to try it and thought it was amazing!

Chicken liver loaf iced in butter. Kind of looked like carrot cake…

…until we sliced into it!

It was excellent.
Red meat: beef, pork, veal, and lamb
Red meat played a prominent role in weeks 4 and 5 too. For beef, we used tender cuts that have a naturally low amount of connective tissue, and therefore utilized quick, dry methods of cooking: searing a tenderloin and grilling a strip loin. Again, the key here was ensuring as little moisture as possible on the meat before putting it on the ripping hot pan / grill, and cooking it only as much as it needed for the inside temperature to become medium rare (around 130°F). The meat thermometer was key here to ensuring that the inside turned out just right — and in the case of trying to get our pieces medium rare, we actually had to make sure the inside was 122-125°F when taking it off the heat due to the “carryover cooking” that happens when meat rests. Another key to my successful day of cooking beef was that my partner’s Rachel’s grandfather was a butcher, so she definitely had great instincts when it came to deciding whether the meat well seasoned, when it was done, how long it should rest. You make your own luck, right? Rachel, next time we cook beef, you’re my girl, okay? I call dibs now.

Grilled sirloin with parsley and shallot compound butter, served medium rare.
Pork also made an appearance on the day that we were introduced to marinades, which are concentrated liquid mixtures that add moisture and flavor to meat. Marinades work on many cuts of meat, penetrating them to infuse them with flavor throughout. When you have a decent amount of acid or salt in a marinade, though, it can break down the proteins in the meat, so for a tender cut you don’t want to leave it in the marinade for too long because it might become mushy. We used pork fillet, which is a tender cut, so we only left it in the fridge for a few hours after covering it with the sweet and sour marinade. We also sautéed pork chops and made a sauteed onion and mustard sauce for them, which really complemented the umami flavor of the pork.

Seared pork chop, finished in the oven, with a super umami onion and mustard sauce. We learned that you always want the a chop to be served in the format of the letter “b” so that the bone is the farthest away from and meat is closest to the presumedly right-handed diners. Also, those are potato cocottes in the background, one of the cuts we had to execute on our final.

Sweet and sour pork, marinated in a mixture of oil, fish sauce, garlic, ginger and lime, garnished with julienned blanched ginger and lime zest. This was the dish for which I threw out the reinforced stock. Good thing the sauce had a lot going on, otherwise I think our instructor would have noticed when he tasted it.
Finally, onto the baby animals. Pieces of veal shoulder were poached gently for over an hour in veal stock and aromatic vegetables, then removed, and the poaching liquid was turned into a creamy sauce via a roux (a cooked mixture of flour and butter) to make the classic dish blanquette de veau. We also made lamb a few ways which, like our duck preparation, showcased how certain cuts of lamb benefit from different cooking times, techniques, and temperatures. Our lamb chops were first browned in a pan and then finished in the oven to get them to medium rare, while the lamb shank, a tougher cut, was braised low and slow in a reinforced stock in the oven, then coated with a reduced shiny sauce from that braising liquid. It was falling off the bone most and almost sticky. It was a good thing.

Blanquette de veau, a preparation of simmered veal served in a creamy sauce made from veal stock and butter.

Spice-rubbed lamb chops served with a compound butter made with roasted garlic, kalamata olives, and rosemary.

Braised lamb shank in red wine sauce with almond and currant couscous.
Game meat: venison and rabbit
On the game meat end, we had venison and rabbit on hand, which taste a lot like beef and chicken, respectively. The venison was a tender and lean loin, so if you’ve been paying attention, you can probably guess what technique we used…that’s right! Quick and hot! Searing, to be exact. Because the venison is so lean, we seasoned it generously with salt right before putting it in the hot pan (versus seasoning further in advance, which could make it tough) and seared it briefly on both sides while we basted it in copious amounts of butter infused with herbs. I think this was one of my most successful dishes to date. The sear was perfect! We also served it with a sour cherry bordelaise sauce (which is a red wine based sauce fortified with butter), which complemented the umami gaminess of the meat perfectly.

I was really proud of the perfect sear on my venison! We were told that it’s best served rare, so it was about 90 hot seconds on either side in a pan before resting and then serving. Also, note fancy latke (unburned) in the back.

Venison, pre-cooking. We seasoned it generously with salt just minutes before cooking because it’s so lean that you don’t want the salt to have the chance to draw out any of its moisture, thereby making it tough or dry. We also basted it in butter as it seared to give it even more moisture and to counteract its leanness.
Our rabbit, which we butchered ourselves, was treated to stew preparation. It had a white-wine based stewing liquid that we turned into a rich sauce by straining it after the rabbit was done cooking in it, and then reducing to a savory, glistening syrup that we used to coat the pieces of rabbit before serving. The sauce tasted like the rabbit itself, but on steroids — the best gravy ever. To accompany it we made another round of pommes purée (mashed potatoes). I remembered my feedback from potato day that my puree needed more butter, so I literally put 1/3 of a lb of butter and at least half a cup of cream in with my one mashed potato. That time it was perfect.

I like to call this dish “rabbit a million ways” though the technical name is rabbit ragout. All of legs were seared and then stewed, then the hind legs were shredded after cooking. Then both sets of legs were basted in the red wine sauce, while the loin was wrapped in the belly and sautéed and the organ meats (liver and kidney) were speared with a sprig of rosemary and seared. In the back is an incredibly buttery potato puree. Probably a 2:1 ratio of potatoes to butter by weight.
There we go. An exhaustive summary of these two weeks - thanks for reading! And now for everyone’s favorite part...
Tips and tricks!
Compound butter is a delicious and easy thing to make that will amp up any meat (or slice of bread, honestly) that you put it on. Simply take some room temperature butter and mash in your ingredients and seasonings of choice, then roll it up in some plastic wrap and refrigerate until you are ready to serve it, slicing off rounds as you go. We made a compound butter with black olives that we paired with lamb, and another with horseradish, lemon and parsley that we paired with a strip loin of beef.
When you’re cooking a duck breast in a pan (I know this is very specific), you actually don’t need any oil. There’s so much fat underneath the skin that it will render out (i.e. permanently melt) and provide more than enough oil to get the skin nice and crispy. HOWEVER there are a few steps you need to take to ensure crispy skin, effective rendering of the fat, and proper cooking of the meat:
First, you must score the skin — criss-cross papercuts to just barely expose the fat underneath.
Then, you want to put a thin layer of salt to coat the bottom of your pan and heat it nice and high
Then, put the breast in skin-side down. The salt will prevent the skin from sticking to the pan; it provides a buffer between the skin and the metal.
Then, turn down the heat to low and let the fat ooze out, occasionally spooning it out of the pan as you go, so there’s always some in the pan but not too much. This can go on for 10 minutes or so!
Depending on how thick your duck breast is, you may also want to finish it in the oven to bring it to the desired internal temperature — typically medium rare.
When braising a piece of meat, you’ve typically seared it first and probably cooked a few vegetables in the pot as well to get it started. Don’t ruin it by adding cold liquid! You’ll stop the beautiful cooking process you’ve begun, which could make the meat get tough, and it will also take time to come back to proper braising temperature (about 180-185°F) extending your long braise even longer.
When cooking a soup or sauce, try kicking it up a notch by using reinforced stock for your base liquid, which is stock that is simmered with meat trimmings and more vegetables for as long as you have time. You don’t need fancy homemade stock to begin with — give it a try with a box of chicken stock from the grocery store, and use spare bones and even some internal organs to beef up that flavor (pun intended). For a little extra oomph, give those trimmings and vegetables a good brown in the pan or oven before you pour the stock on top. You will thank yourself later when you’re diving headfirst into a bowl of out-of-this-world homemade soup!
Buy yourself an inexpensive thermometer and say goodbye to the guessing game that involves making incisions into your meat a few times throughout cooking and losing those delicious natural juices with each cut. I really like this one from Javelin which was recommended by our instructor. Bonus: you can also use your thermometer to make sure your liquid is the right temperature when poaching something, like eggs! Should be between 160-180°F. More on that next week.
Thanks for reading! As always, please leave questions / comments / feedback in the comments below or contact me with your thoughts.